A malfunctioning car heater can transform a comfortable drive into a shivering ordeal, especially during colder months. Understanding the potential causes behind a weak or non-functional heater is crucial for both comfort and safety. This guide provides a straightforward, step-by-step approach to diagnosing common heater issues, empowering you to identify the problem and potentially fix it yourself, saving time and money.
From simple checks like coolant levels and blower motor function to more advanced troubleshooting involving the heater core and thermostat, we’ll cover a range of diagnostic techniques. Whether you’re a seasoned DIY enthusiast or a novice car owner, this guide will equip you with the knowledge to tackle your car’s heating woes effectively.
Identifying the Problem
A malfunctioning car heater can be incredibly frustrating, leaving you shivering on cold days. Pinpointing the source of the problem is the first step towards a warm and comfortable ride. This section will guide you through identifying common heater issues, helping you diagnose the problem efficiently. We’ll explore the symptoms associated with various potential causes, providing a structured approach to troubleshooting.
Common Car Heater Problems
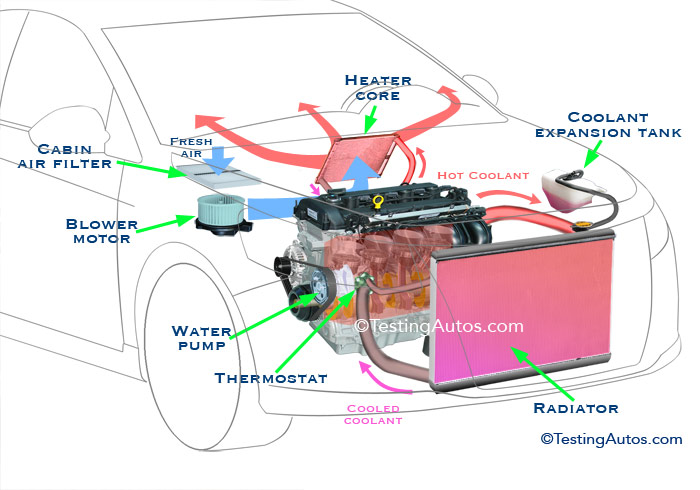
Several components contribute to your car’s heating system. A problem in any one of these areas can lead to inadequate or no heat. Understanding these components and their potential failures is crucial for effective diagnosis.
- Malfunctioning Blower Motor: This motor pushes air through the heater core and into the cabin. A faulty motor might result in weak or no airflow, regardless of the temperature settings.
- Faulty Thermostat: The thermostat regulates the flow of coolant to the heater core. A malfunctioning thermostat can prevent coolant from reaching the heater core, resulting in no heat or inconsistent heating.
- Clogged Heater Core: The heater core is a small radiator that warms the air. Over time, debris and rust can clog it, reducing its efficiency and leading to weak or no heat.
- Low Coolant: Insufficient coolant means less heat transfer to the heater core. Low coolant levels can be due to leaks or simply not enough coolant in the system.
- Electrical Issues: Problems with wiring, fuses, relays, or the heater control unit can interrupt the power supply to the blower motor or other components, preventing the heater from functioning correctly.
Troubleshooting Flowchart
A systematic approach is essential for effective diagnosis. Follow these steps to isolate the problem:
- Check the Blower Motor: Turn the fan to its highest setting. If no air is blowing, the blower motor might be faulty. If air blows, proceed to step 2.
- Check Coolant Level: Inspect the coolant reservoir. If the level is low, add coolant and check for leaks. If the level is adequate, proceed to step 3.
- Check Thermostat Function: Observe the engine temperature gauge. If the engine is overheating but the heater is not working, the thermostat might be faulty. If the engine is at the correct temperature, proceed to step 4.
- Check Heater Core: This often requires professional inspection as it involves flushing the system. If the above steps don’t reveal the problem, a clogged heater core is a possibility.
- Check Electrical System: If all the above steps have been checked, and the problem persists, electrical issues, such as blown fuses or faulty wiring, might be the cause. This typically requires a professional mechanic to diagnose and repair.
Comparison of Heater Problems
| Problem | Symptoms | Possible Causes | Initial Checks |
|---|---|---|---|
| Malfunctioning Blower Motor | No air flow from vents, regardless of temperature setting. | Worn-out motor, blown fuse, faulty wiring. | Check fuses, listen for motor sounds when switched on. |
| Faulty Thermostat | Inconsistent heating, engine overheating, heater only works intermittently. | Stuck thermostat, malfunctioning thermostat sensor. | Observe engine temperature gauge, check thermostat operation. |
| Clogged Heater Core | Weak or reduced airflow, lukewarm air even at high temperature settings. | Buildup of debris, rust, corrosion. | Check coolant level for signs of contamination, observe for unusual coolant behavior. |
| Low Coolant | Weak or no heat, engine overheating. | Leaks in the cooling system, insufficient coolant. | Check coolant level in the reservoir, inspect for leaks around hoses and radiator. |
| Electrical Issues | No heat, blower motor doesn’t work, other electrical components may malfunction. | Blown fuses, faulty wiring, malfunctioning heater control unit. | Check all relevant fuses, inspect wiring for damage. |
Simple Checks and Tests You Can Do Yourself
Before diving into more complex repairs, several straightforward checks can help pinpoint the source of your heater woes. These simple tests can often save you time and money by identifying easily fixable issues. Performing these checks yourself can also provide valuable information to a mechanic if professional assistance is needed.
Coolant Level and Condition
Checking your coolant level and condition is a crucial first step. Low coolant levels directly impact the heater’s ability to produce warm air, as the coolant is the medium that transfers heat from the engine to the cabin. A compromised coolant mixture can also lead to reduced heating efficiency or even damage to your engine. To check the coolant level, locate your coolant reservoir (often a translucent plastic tank). The reservoir will have minimum and maximum fill lines; the level should be between these markings. If the level is low, carefully add a 50/50 mixture of coolant and distilled water. Never use tap water, as minerals can damage your cooling system. Always add coolant to a cool engine; adding coolant to a hot engine can cause a dangerous steam eruption. Inspect the coolant itself. Look for discoloration (rust, brown, or milky appearance), which indicates potential problems like leaks or contamination. If the coolant is discolored or the level consistently drops, consult a mechanic.
Blower Motor Operation
The blower motor is responsible for pushing air through the heater core and into your vehicle’s cabin. A malfunctioning blower motor will result in no airflow, regardless of the temperature settings. To test the blower motor, turn on the ignition and set the fan to its highest speed. You should hear a whirring sound from the blower motor, typically located behind the dashboard. If you don’t hear anything or the airflow is weak, the blower motor itself might be faulty or the blower motor resistor may be the problem. The blower motor resistor regulates the fan speed. If you suspect a faulty resistor, you’ll likely need to access it (usually located behind the glove box or under the dash), visually inspect it for any signs of damage (burn marks, etc.), and potentially replace it. This is often a more involved process and might require some mechanical aptitude or professional help.
Visual Inspections
A quick visual inspection can often reveal the source of your heating problem. It’s important to check these areas before proceeding to more complex diagnostics.
- Check the fuses: Locate the fuse box (usually under the hood or inside the cabin) and check the fuses related to the heater system. A blown fuse will interrupt the power supply to the heater. Replace any blown fuses with fuses of the correct amperage.
- Inspect heater hoses: Carefully examine the heater hoses for any signs of leaks (dripping coolant), cracks, or kinks. Kinks restrict coolant flow, reducing heating efficiency. Leaks require immediate attention to prevent coolant loss and potential engine damage.
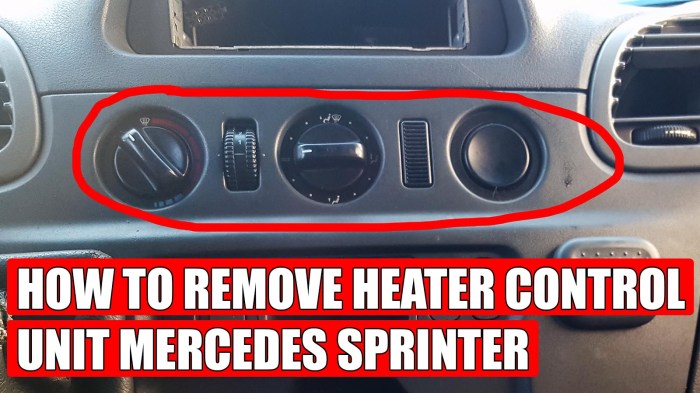
- Examine the heater controls: Ensure the heater controls (knobs, buttons, or digital display) are functioning correctly. If the controls are malfunctioning, they might be preventing the heater from operating properly. A malfunctioning control unit might require professional attention.
Advanced Troubleshooting and Potential Solutions
If the simple checks haven’t solved your heater woes, more in-depth troubleshooting may be necessary. This section Artikels advanced techniques to pinpoint and resolve persistent heater problems. Remember to always prioritize safety and consult a professional mechanic if you are uncomfortable performing these procedures.
Heater Core Flushing Procedure
A blocked heater core restricts coolant flow, leading to inadequate heat. Flushing the core involves cleaning out debris and sediment. Before beginning, ensure the engine is completely cool to avoid burns. You’ll need a garden hose, a container to collect the flushing solution, and a suitable flushing agent (available at most auto parts stores). Disconnect the heater core hoses – carefully, as coolant may remain inside – and attach the hose to one inlet, running water through the core until the outflow is clear. Repeat this process in reverse. After flushing, reconnect the hoses, refill the coolant system, and check for leaks. Remember to dispose of the flushing solution responsibly. Failure to properly flush the heater core may lead to further damage or corrosion. For example, a severely corroded heater core might require replacement rather than just flushing.
Faulty Thermostat Replacement
A malfunctioning thermostat can prevent coolant from reaching the heater core efficiently. Identifying a faulty thermostat often involves feeling the upper radiator hose; if it remains cold even after the engine has warmed up, the thermostat may be stuck closed. Replacing it involves several steps.
Step-by-Step Thermostat Replacement (Illustrated):
Step 1: Locating the Thermostat Housing. The thermostat housing is typically located on the engine block, near the top hose of the radiator. It’s usually a cylindrical metal casing with bolts securing it. Imagine a metal cylinder about the size of a large orange, often near the top of the engine, attached to a rubber hose.
Step 2: Draining Coolant. Before removing the housing, drain some of the engine coolant to prevent a large spill. Locate the drain plug at the bottom of the radiator, place a container underneath, and carefully loosen the plug.
Step 3: Removing the Thermostat Housing. Remove the thermostat housing by loosening the retaining bolts, which are typically located on the top of the housing. Observe the gasket for damage before installing the new thermostat. The gasket is a rubber or silicone ring that seals the housing; a damaged gasket can lead to leaks.
Step 4: Removing the Thermostat. Carefully remove the old thermostat from the housing. Note its orientation for correct reinstallation. The thermostat is a small, disc-like device with a spring mechanism inside.
Step 5: Installing the New Thermostat. Install the new thermostat, ensuring it is correctly oriented, and replace the gasket. Tighten the retaining bolts to the manufacturer’s specified torque. Avoid over-tightening, which can damage the housing.
Step 6: Refill and Bleed the System. Refill the coolant system, ensuring there are no air bubbles trapped in the system. This is crucial for proper cooling and heating. Air pockets can prevent efficient heat transfer.
Heater Core Types Comparison
Different types of heater cores exist, each with its own advantages and disadvantages. Choosing the right one depends on factors like vehicle type, budget, and desired performance.
| Type | Material | Pros | Cons |
|---|---|---|---|
| Standard Copper/Brass | Copper and Brass | Durable, efficient heat transfer, relatively inexpensive | Can corrode over time, heavier than other types |
| Aluminum | Aluminum | Lightweight, good heat transfer, resists corrosion better than copper/brass | Can be more expensive than copper/brass, may be more susceptible to damage from impacts |
| Plastic | Various plastics | Lightweight, inexpensive, resists corrosion | Lower heat transfer efficiency than metal cores, shorter lifespan |
Conclusion
Successfully diagnosing your car’s heater problems often involves a methodical approach, combining simple visual inspections with more in-depth checks. By systematically eliminating potential causes, as Artikeld in this guide, you can pinpoint the source of the issue and determine the best course of action. Remember, safety is paramount; if you’re unsure about any step, consult a qualified mechanic. With a little patience and the right knowledge, you can restore warmth and comfort to your winter drives.