Experiencing mysterious electrical gremlins in your car? From flickering lights to a complete no-start situation, electrical problems can leave you stranded and frustrated. This guide provides a straightforward, step-by-step approach to diagnosing and, in many cases, resolving common automotive electrical issues. We’ll explore simple visual inspections, basic multimeter tests, and troubleshooting techniques to empower you to tackle these problems confidently.
Understanding your car’s electrical system doesn’t require advanced engineering knowledge. By systematically checking components and using readily available tools, you can often pinpoint the source of the problem and implement effective solutions, saving time and money on potentially costly repairs. This guide will equip you with the skills and understanding to confidently approach automotive electrical diagnostics.
Identifying Electrical Issues
Diagnosing car electrical problems can seem daunting, but a systematic approach can quickly pinpoint the source. Understanding common symptoms and employing basic diagnostic tools will significantly improve your chances of a successful repair. This section will guide you through identifying the problem, starting with recognizing common symptoms.
Common Symptoms of Car Electrical Problems
Recognizing the symptoms is the first crucial step in diagnosing your car’s electrical issues. Various symptoms can point to different problems, ranging from minor inconveniences to major safety concerns. The severity and required action will depend on the specific symptom and its impact on vehicle operation.
| Symptom | Possible Cause | Severity | Recommended Action |
|---|---|---|---|
| Dimming headlights | Low battery charge, alternator failure, faulty wiring | Medium | Check battery voltage, test alternator output, inspect wiring |
| Slow cranking | Low battery charge, weak battery, faulty starter motor, corroded battery terminals | Medium to High | Check battery voltage, inspect battery terminals, test starter motor |
| Non-functioning accessories (e.g., power windows, radio) | Blown fuse, faulty switch, wiring problem | Low to Medium | Check fuses, inspect switches and wiring |
| Interior lights staying on after car is off | Faulty door switch, short circuit in the wiring | Low to Medium | Inspect door switches and wiring for shorts |
Visual Inspection of Wiring Harnesses
A thorough visual inspection is often the quickest and easiest way to identify many electrical problems. Look for any signs of damage, corrosion, or loose connections in your car’s wiring harnesses. This simple check can save you time and effort before resorting to more complex diagnostic procedures.
Focus your inspection on these key areas:
- Battery terminals: Check for corrosion, looseness, and secure connections.
- Wiring harnesses near the engine: Look for chafing, fraying, or melted insulation due to heat.
- Connectors and splices: Examine for corrosion, loose pins, or broken wires.
- Under-hood wiring: Inspect for damage caused by rodents or other environmental factors.
- Interior wiring: Check for damage caused by wear and tear or modifications.
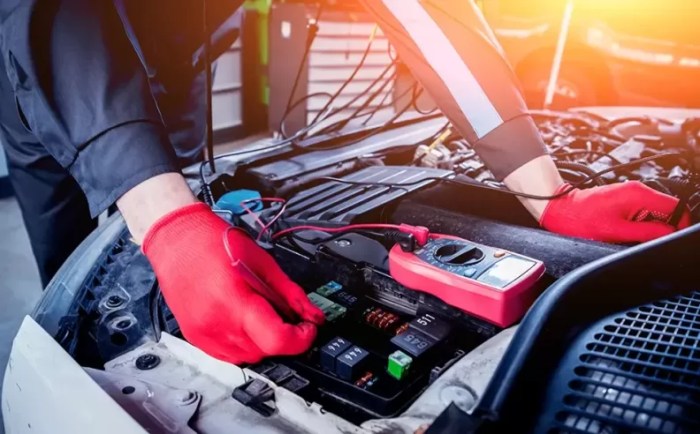
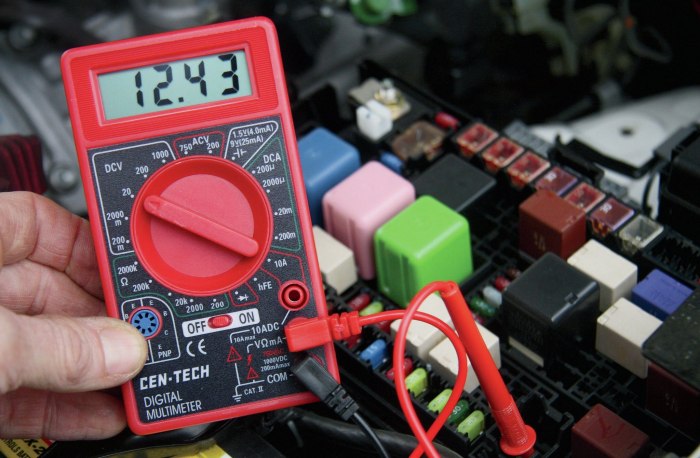
Testing Battery Voltage and Charging System Output with a Multimeter
A multimeter is an invaluable tool for diagnosing electrical problems. It allows you to accurately measure voltage and current, providing crucial data for identifying issues with the battery and charging system.
To test the battery voltage:
- Turn off all electrical accessories in the vehicle.
- Set the multimeter to measure DC voltage (usually indicated by a “V” symbol with a “-” next to it).
- The multimeter’s red probe should be connected to the positive (+) terminal of the battery, while the black probe connects to the negative (-) terminal. Observe the voltage reading displayed on the screen. A reading below 12.6V indicates a low battery charge.
- A reading between 12.6V and 13.2V indicates a fully charged battery.
To test the charging system output:
- Start the engine.
- With the engine running, connect the multimeter probes to the battery terminals as described above. The voltage reading should now be between 13.5V and 14.5V. A reading lower than this indicates a problem with the alternator or charging system.
Testing Electrical Components
Testing your car’s electrical components can seem daunting, but with the right tools and a systematic approach, it’s manageable. A multimeter is your best friend here, allowing you to measure voltage, current, and resistance. This section details how to test key components and troubleshoot common issues. Remember to always disconnect the negative battery terminal before starting any electrical tests to prevent short circuits and potential injury.
Alternator, Starter Motor, and Other Key Component Testing
A multimeter is essential for testing the alternator, starter motor, and other key electrical components. Different components require different tests, focusing on voltage, current, or resistance depending on the component’s function. For example, checking the alternator involves measuring its output voltage while the engine is running, while testing the starter motor often involves checking its resistance. Always consult your vehicle’s repair manual for specific testing procedures and voltage/resistance specifications. Incorrect readings may indicate a faulty component.
| Component | Test Procedure | Expected Reading | Possible Issues if Reading is Off |
|---|---|---|---|
| Alternator | Measure voltage at the battery terminals with the engine running. | 13.5-14.5 volts | Low voltage indicates a failing alternator; high voltage may indicate a regulator problem. |
| Starter Motor | Measure resistance across the starter motor terminals. | Low resistance (typically less than 1 ohm) | High resistance indicates internal problems within the starter motor. |
| Battery | Measure voltage at the battery terminals with the engine off. | 12.6 volts (fully charged) | Low voltage indicates a low charge; high voltage may indicate a charging system problem. |
Fuse and Relay Diagnosis and Replacement
Fuses and relays are crucial for protecting your car’s electrical circuits. A blown fuse is usually indicated by a broken filament visible through the fuse’s transparent window. Relays, on the other hand, may require more involved testing to identify a fault. They often click when activated, and a lack of clicking could indicate a problem.
Replacing a blown fuse is straightforward:
- Locate the blown fuse using your vehicle’s fuse box diagram. Fuse boxes are typically located under the hood or inside the cabin.
- Use a fuse puller or pliers to carefully remove the blown fuse.
- Check the amperage rating printed on the blown fuse and replace it with a fuse of the same rating.
- Verify the replacement fuse is correctly seated.
Identifying a faulty relay is more complex and often requires a multimeter to check continuity and voltage. However, a visual inspection can sometimes reveal obvious signs of damage, such as burns or corrosion.
Common fuse types include blade fuses (small, rectangular fuses with metal blades) and ATO/ATC fuses (similar to blade fuses but slightly larger). Relays typically have multiple terminals and a metal casing.
Troubleshooting the Car’s Lighting System
Malfunctioning car lights can be frustrating but are usually easy to fix. Problems can stem from blown bulbs, faulty wiring, or issues with the light switch. Systematic troubleshooting can pinpoint the source of the problem.
Here’s a step-by-step guide to troubleshooting your car’s lighting system:
- Check the bulbs: Start by visually inspecting all bulbs for damage or burns. Replace any burned-out bulbs with new ones of the correct type and wattage.
- Inspect the wiring: Look for any visible damage to the wiring, such as fraying, corrosion, or loose connections. Repair or replace any damaged wiring.
- Test the fuses and relays: Check the fuses and relays associated with the affected lights. Replace any blown fuses and test the relays using a multimeter.
- Check the light switch: Ensure the light switch is functioning correctly. If the switch is faulty, it will need to be replaced.
- Inspect the grounds: Poor ground connections can prevent lights from working. Clean and tighten any corroded ground connections.
Advanced Troubleshooting and Repair
Successfully identifying and testing electrical components brings us to the next stage: advanced troubleshooting and repair. This involves a more systematic approach, often utilizing specialized tools and a deeper understanding of your vehicle’s electrical system. This section will cover strategies for complex diagnostic scenarios, common problem solutions, and the interpretation of wiring diagrams.
No-Start Condition Diagnostic Flowchart
A no-start condition can stem from various electrical issues. A methodical approach is crucial. The following flowchart Artikels a diagnostic process, focusing on electrical causes:
                                     No-Start Condition
                                           |
                                           V
Is the battery charged? (Voltage test)
                                           |
                                      Yes          No
                                           |           |
                                           V           V
Check ignition switch power.      Charge or replace battery.
                                           |           |
                                           V           V
Is there power at the starter? (Voltage test)     Return to No-Start Condition
                                           |
                                      Yes          No
                                           |           |
Check starter solenoid operation.   Check ignition switch, wiring, and fuses.
                                           |           |
                                           V           V
Is the starter engaging?        Return to No-Start Condition
                                           |
                                      Yes          No
                                           |           |
Check engine cranking.         Check starter motor, wiring, and connections.
                                           |           |
                                           V           V
Engine starts?                 Return to No-Start Condition
                                           |
                                      Yes          No
                                           |           |
Problem solved.              Further investigation required (e.g., PCM issues).
This flowchart guides you through a logical sequence, starting with the simplest checks and progressing to more complex components. Remember to always disconnect the negative battery terminal before working on the electrical system.
Common Electrical Problems and Solutions
Understanding common electrical problems and their solutions is vital for efficient repairs. The following table categorizes issues by car system:
| Car System | Common Problem | Possible Solution |
|---|---|---|
| Starting System | Slow cranking | Check battery voltage and condition, inspect battery terminals and cables for corrosion, test starter motor. |
| Starting System | No cranking | Check battery voltage, fuses, ignition switch, starter solenoid, starter motor, and wiring connections. |
| Charging System | Battery light on | Test alternator output voltage, check alternator belt tension, inspect wiring and connections. |
| Charging System | Battery draining | Check for parasitic drain using a multimeter, inspect for faulty components drawing excessive current (e.g., interior lights, radio). |
| Lighting System | Headlights not working | Check bulbs, fuses, headlight switch, and wiring connections. |
| Lighting System | Tail lights not working | Check bulbs, fuses, wiring connections, and related switches. |
This table provides a general overview; specific solutions will depend on the vehicle’s make and model.
Using Wiring Diagrams for Troubleshooting
Wiring diagrams are essential tools for tracing electrical circuits. They provide a visual representation of the vehicle’s electrical system, showing how different components are interconnected. A typical wiring diagram uses standardized symbols to represent components (e.g., a circle for a light bulb, a rectangle for a relay) and lines to show the wiring paths. The diagram also indicates wire colors and gauges, which aid in identification. By carefully following the diagram, you can trace a circuit from its power source to its destination, identifying potential fault points along the way. For example, if a headlight isn’t working, you can follow the circuit path on the diagram from the battery, through the fuse, the switch, and the wiring harness, to the bulb itself. This allows you to pinpoint the exact location of the problem, whether it’s a blown fuse, a faulty switch, a broken wire, or a burnt-out bulb. The diagram will often include connector locations and component numbers for further identification. Proper interpretation of these diagrams requires patience and attention to detail. It is important to consult a wiring diagram specific to your vehicle’s year, make, and model.
End of Discussion

Successfully diagnosing automotive electrical issues often involves a methodical approach, combining visual inspection with the use of a multimeter. By following the steps Artikeld in this guide, you’ve gained the tools to troubleshoot a wide range of common problems. Remember, safety is paramount; always disconnect the battery’s negative terminal before working on electrical components. With patience and careful observation, you can often restore your vehicle’s electrical system to full functionality, saving yourself the expense and inconvenience of professional repairs.