A malfunctioning car air conditioner can transform a pleasant drive into an uncomfortable ordeal. Understanding the basics of your vehicle’s AC system empowers you to troubleshoot minor issues and potentially avoid costly repairs. This guide provides a straightforward approach to diagnosing common AC problems, enabling you to identify the source of the trouble and take appropriate action.
From identifying weak airflow or unusual noises to understanding the difference between refrigerant leaks and compressor failures, we’ll walk you through a series of simple checks. These steps will help you determine whether a quick fix is possible or if professional assistance is needed. Armed with this knowledge, you can approach AC problems with confidence and keep your car cool and comfortable.
Identifying AC System Issues
Diagnosing your car’s air conditioning problems often begins with recognizing the symptoms. Understanding these clues can help pinpoint the source of the issue and guide your repair strategy, saving you time and money. A systematic approach, starting with a careful observation of your AC’s performance, is key to effective troubleshooting.
Identifying the specific problem with your car’s AC system requires understanding the various symptoms and their potential causes. A malfunctioning AC system can manifest in several ways, ranging from a simple fix to a more complex repair.
Common AC System Symptoms and Their Causes
The following table summarizes common symptoms, their possible causes, severity, and recommended actions. Note that this is not an exhaustive list, and professional diagnosis may be required for complex issues.
| Symptom | Possible Cause | Severity Level | Recommended Action |
|---|---|---|---|
| Weak Airflow | Clogged air filter, restricted vents, failing blower motor | Low | Check and replace air filter, inspect vents, check blower motor operation |
| No Cold Air | Low refrigerant, compressor failure, electrical issues | Medium to High | Check refrigerant levels, inspect compressor, check electrical connections |
| Unusual Noises (Hissing, Rattling, Grinding) | Refrigerant leak, failing compressor, loose components | Medium to High | Inspect system for leaks, listen closely to identify the source of the noise, consult a mechanic |
| Strange Odors (Musty, Sweet, Burning) | Mold growth in evaporator, electrical component failure, refrigerant leak | Low to Medium | Inspect evaporator, check for burned wires or components, address any refrigerant leaks |
Refrigerant Leaks vs. Compressor Failures
Refrigerant leaks and compressor failures are two common, yet distinct, problems affecting car AC systems. Understanding the differences is crucial for accurate diagnosis and effective repair.
A refrigerant leak results in a gradual decrease in cooling performance. Symptoms include weak airflow and eventually no cold air, often accompanied by a hissing sound. Visually inspecting the system for leaks, using a leak detection dye, is a standard diagnostic procedure. A failing compressor, on the other hand, may exhibit symptoms such as unusual noises (grinding, clicking), reduced or no cooling, and potentially a complete lack of airflow. The compressor is a vital component and failure often requires a full system check and potential replacement.
Visual Inspection of AC System Components
A thorough visual inspection can often reveal the source of an AC problem. This should be done carefully and systematically, paying attention to details. Remember safety first; always disconnect the battery’s negative terminal before working on any electrical components.
Before beginning, it’s recommended to consult your vehicle’s service manual for specific locations of components. The following provides a general guideline for inspection.
- Condenser: Inspect for dents, bends, or leaks. Look for any signs of damage to the fins, as these can restrict airflow and reduce efficiency. A damaged condenser might show signs of oil leakage.
- Evaporator: Accessing the evaporator may require partial disassembly, depending on your vehicle. Look for signs of mold or debris buildup which can restrict airflow and lead to musty odors.
- Hoses and Lines: Carefully examine all hoses and lines for cracks, bulges, or leaks. Look for discoloration or signs of wear and tear. A soapy water solution can help detect small leaks.
- Compressor: Check for any signs of damage, leaks, or unusual noises during operation. Listen for grinding or clicking sounds, indicating potential bearing failure.
- Belts and Pulleys: Inspect the serpentine belt (if applicable) and the compressor pulley for wear, cracks, or slippage. A worn belt can affect compressor operation.
Simple Troubleshooting Steps
Diagnosing your car’s AC problems often involves a series of simple checks before resorting to professional help. These steps can help you pinpoint the issue and potentially save you time and money. Remember to always consult your vehicle’s owner’s manual for specific locations and procedures.
Checking AC System Fuses and Relays
Fuses and relays are crucial components protecting the AC system’s electrical circuits. A blown fuse or faulty relay can prevent the compressor from engaging, leading to a non-functional AC system. Locating and checking these components is a straightforward process.
The location of your fuse box varies depending on the make and model of your car. It’s usually found under the hood, often near the battery, or sometimes inside the cabin, typically under the dashboard. Your owner’s manual will provide a diagram showing the precise location and layout of the fuse box. The fuse box usually has a cover with a diagram indicating the function of each fuse.
Example Diagram (Generic): Imagine a fuse box diagram showing numbered fuses, with a legend indicating which fuse controls the AC compressor (e.g., Fuse #10: A/C Compressor). The diagram would visually represent the fuses’ arrangement within the box, allowing for easy identification. Another section might show relays, similarly numbered and labeled according to their function.
To check a fuse, carefully remove it from its slot and inspect the thin wire inside. A blown fuse will show a visible break in the wire. Replace any blown fuse with one of the same amperage rating. Relays, on the other hand, are usually checked for continuity using a multimeter. A multimeter can test whether electricity is flowing through the relay; a non-functioning relay would show no continuity.
Checking the AC Clutch Engagement
The AC clutch is an electromagnetic device that connects and disconnects the AC compressor. Proper engagement is vital for the compressor to function correctly. Checking the clutch’s engagement is a visual inspection that can quickly identify a problem.
With the engine running and the AC switched on, locate the AC compressor. It’s usually a large cylindrical component near the engine. Observe the AC clutch pulley, a small pulley attached to the compressor. When the AC clutch is engaged, the pulley will spin at the same speed as the engine’s crankshaft pulley. You’ll visually see the pulley rotating rapidly.
AC Clutch Engaged: The AC clutch is magnetically engaged, causing the pulley to rotate freely and the compressor to work. This visual observation will show the pulley spinning with the engine.
AC Clutch Disengaged: If the AC clutch is disengaged, the pulley will remain stationary, even with the engine running and the AC switched on. This indicates a potential issue with the clutch itself, the electrical system, or the refrigerant level.
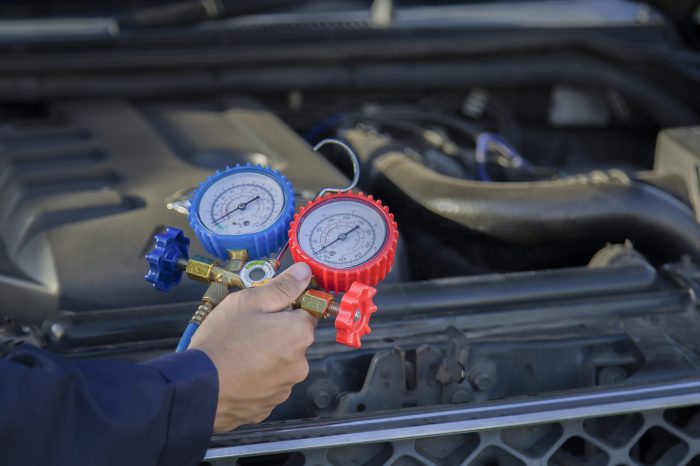
Checking the Refrigerant Level
Refrigerant is the essential component that facilitates cooling within the AC system. Low refrigerant levels can severely impact cooling performance or even damage the compressor. Checking the refrigerant level requires using a refrigerant gauge, a specialized tool for measuring the pressure and temperature of the refrigerant. This is a process best handled with caution, and professional help may be recommended if you are not comfortable.
Safety Precautions: Refrigerant is under high pressure and can cause serious injury if mishandled. Always wear safety glasses and gloves. Work in a well-ventilated area. Never attempt to add refrigerant without proper knowledge and equipment.
- Connect the Gauge: Connect the refrigerant gauge to the low-pressure port (usually marked with a blue cap) on the AC system. This port is usually located near the compressor or condenser.
- Turn on the AC: Start the car’s engine and turn on the AC system to high. Allow the system to run for a few minutes to stabilize the refrigerant pressure.
- Read the Gauge: Observe the gauge reading. The reading will indicate the pressure and temperature of the refrigerant. Consult your vehicle’s service manual for the recommended pressure range. A low reading indicates low refrigerant levels.
- Do Not Add Refrigerant: Adding refrigerant should only be done by a qualified technician. Low refrigerant levels usually indicate a leak in the system, which needs professional repair before adding refrigerant.
Addressing Potential Solutions

Once you’ve identified the problem with your car’s AC system, it’s time to address the potential solutions. This involves understanding the root cause and implementing the appropriate fix. Remember, working with refrigerants requires proper safety precautions and specialized equipment; if you’re uncomfortable performing these tasks yourself, consult a qualified mechanic.
Low Refrigerant Solutions
Low refrigerant is a common cause of poor AC performance. This can stem from leaks in the system or insufficient initial charge. Identifying and repairing the leak is crucial before recharging. A leak detection dye can help pinpoint the source of the leak, often found in seals, hoses, or the condenser. Once the leak is repaired, the system can be recharged using an AC refrigerant charging kit, following the manufacturer’s instructions carefully. The process typically involves connecting the kit to the system’s low-pressure port, and adding refrigerant until the desired pressure is reached. Always refer to your vehicle’s service manual for specific refrigerant type and charge amount.
Low Refrigerant Troubleshooting Flowchart
[Imagine a flowchart here. The flowchart would start with “Low Refrigerant Detected?”. A “Yes” branch would lead to “Locate Leak (Dye Test)”. A “No” branch would lead to “Check other AC components”. From “Locate Leak”, a “Leak Found?” branch would split to “Repair Leak” (leading to “Recharge System”) and “No Leak Found” (leading to “Check for other issues”). From “Recharge System”, the flowchart would end with “Test AC System”. From “Check other AC components” it would lead to other diagnostic steps, potentially cycling back to “Low Refrigerant Detected?” if low refrigerant is still found after checking other components.]
Malfunctioning Compressor Issues and Solutions
The compressor is the heart of your AC system, circulating refrigerant. Several issues can affect its performance.
| Compressor Issue | Possible Causes | Solutions |
|---|---|---|
| Compressor Clutch Doesn’t Engage | Low refrigerant, faulty clutch relay, wiring issues, bad clutch coil | Check refrigerant levels, replace relay, check wiring, replace clutch coil |
| Compressor Makes Noise | Worn bearings, seized components, low lubrication | Compressor replacement or repair (often requires professional assistance) |
| Compressor Fails to Operate | Electrical failure, seized internal components, damaged belt | Check wiring and fuses, replace compressor, replace serpentine belt |
Condenser Fin Cleaning
A dirty condenser restricts airflow, reducing cooling efficiency. Cleaning the fins is a simple yet effective maintenance task. Use a fin comb or a soft brush to gently straighten bent fins and remove debris. For stubborn dirt, you can use a gentle water spray. Avoid using high-pressure water, which can damage the fins.
[Imagine two images here. The first image depicts a condenser with severely clogged fins, showing dirt and debris buildup. The second image shows the same condenser after cleaning, with the fins clear and unobstructed. The difference in cleanliness is visibly apparent, emphasizing the impact of proper maintenance.]
Final Thoughts
Successfully diagnosing your car’s AC problems often involves a combination of observation, simple tests, and a bit of detective work. By systematically checking fuses, the AC clutch, and refrigerant levels, you can often pinpoint the source of the issue. Remember, safety is paramount; always prioritize safety precautions when working with refrigerants. This five-step process provides a valuable foundation for maintaining your vehicle’s climate control system and ensuring a comfortable driving experience. If you’re unsure about any step, don’t hesitate to consult a qualified mechanic.