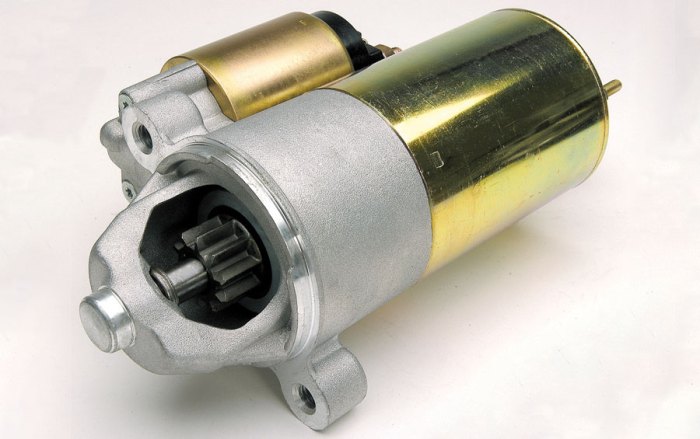
A car’s starter motor is a crucial component, silently working to ignite your engine. However, its reliable performance can degrade over time, leading to frustrating breakdowns. Understanding the early warning signs of a failing starter is key to preventing unexpected roadside emergencies and costly repairs. This guide explores eight common symptoms, helping you diagnose the problem and take proactive steps to maintain your vehicle’s health.
From subtle clicking noises to complete engine refusal, the symptoms of a failing starter can vary significantly. Recognizing these signs early can save you time, money, and potential inconvenience. This comprehensive overview will provide detailed descriptions, practical examples, and troubleshooting techniques to equip you with the knowledge to address potential starter issues effectively.
Identifying the 8 Symptoms
A failing car starter can leave you stranded, so understanding the warning signs is crucial for preventing unexpected breakdowns. Recognizing these symptoms early can save you time, money, and frustration. This guide details eight common indicators of a failing starter motor, enabling you to address the issue before it becomes a major problem.
The Eight Symptoms of a Failing Car Starter
Identifying a failing starter involves recognizing a combination of visual and auditory clues. These symptoms, while sometimes subtle initially, become increasingly pronounced as the starter deteriorates. Early detection allows for timely repairs, preventing more extensive and costly damage.
Slow Cranking
Slow cranking is a common early sign. The engine turns over sluggishly when you turn the ignition key, taking noticeably longer than usual to start. This could be due to a weakening starter motor struggling to generate sufficient power. For example, you might notice the engine turning over slowly, with a faint whirring sound, before eventually starting. If the engine fails to start after several attempts, this points towards a more serious issue.
Clicking Noise
A rapid clicking sound from the starter area when you turn the ignition key indicates a problem with the starter solenoid. The solenoid is responsible for engaging the starter motor. The clicking sound signifies that the solenoid is receiving power but isn’t engaging the motor effectively. Imagine the sound of a rapidly clicking relay switch; this is often indicative of low battery voltage or a faulty starter solenoid.
Grinding Noise
A grinding noise during cranking suggests the starter gear is not meshing correctly with the engine’s flywheel. This can damage both components if not addressed promptly. The sound is a harsh, metallic grinding, quite different from the normal whirring of a healthy starter. This could be due to a misaligned starter or worn-out gear teeth.
No Cranking at All
Complete failure to crank is a clear sign of a serious starter problem. Turning the key results in no sound or response from the engine. This is often accompanied by a lack of dashboard lights or other electrical functions. This points to a completely dead starter motor or a significant electrical fault in the starting circuit.
Starter Motor Stays Engaged
If the starter motor continues to spin even after the engine has started, it indicates a failure of the starter’s disengagement mechanism. This can severely damage the starter and the engine’s flywheel. This continuous spinning sound after engine start is very noticeable and should be addressed immediately to prevent serious engine damage.
Overheating Starter
An overheated starter motor can smell strongly of burning wires or components. This is often accompanied by smoke or visible damage to the starter casing. Touching the starter motor (after allowing it to cool sufficiently) may reveal excessive heat. This is a clear indication of internal failure within the starter motor itself.
Dim Headlights While Cranking
Dimming headlights during cranking suggests insufficient battery power reaching the starter. While not always directly a starter problem, a weak battery can prevent the starter from receiving adequate power to function correctly. The reduced headlight brightness is noticeable when you turn the ignition key to start the engine.
Battery Issues
A weak or failing battery can mimic many of the symptoms of a failing starter, including slow cranking, clicking, and even complete failure to crank. Therefore, testing the battery’s voltage is crucial to differentiate between battery issues and a failing starter. A low voltage reading confirms a battery problem needing replacement or charging.
| Symptom | Description | Cause | Severity |
|---|---|---|---|
| Slow Cranking | Engine turns over sluggishly. | Weak starter motor, low battery voltage. | Medium |
| Clicking Noise | Rapid clicking sound from starter area. | Faulty starter solenoid, low battery voltage. | Medium |
| Grinding Noise | Harsh, metallic grinding during cranking. | Misaligned starter, worn starter gear. | High |
| No Cranking | No sound or response from engine when turning the key. | Completely failed starter motor, electrical fault. | High |
| Starter Stays Engaged | Starter continues spinning after engine starts. | Failure of starter disengagement mechanism. | High |
| Overheating Starter | Burning smell, smoke, excessive heat. | Internal starter motor failure. | High |
| Dim Headlights While Cranking | Headlights dim significantly during cranking. | Low battery voltage. | Medium |
| Battery Issues | Various symptoms mimicking starter failure. | Weak or failing battery. | Medium |
Diagnosing the Problem
Pinpointing the exact cause of a failing car starter can be challenging, even for experienced mechanics. Many symptoms overlap, and a hasty diagnosis can lead to unnecessary repairs and wasted time. A systematic approach, employing various diagnostic techniques, is crucial for accurate fault identification.
Diagnosing a failing starter requires careful observation and methodical testing. Common mistakes include jumping to conclusions based on a single symptom, neglecting to check basic connections, and overlooking the role of the battery and its related circuitry. A thorough examination, following a logical sequence of tests, is essential to avoid these pitfalls.
Common Diagnostic Mistakes
Misinterpreting symptoms is a frequent error. For instance, a slow cranking engine might be attributed solely to a weak starter motor, when in reality, a low battery voltage or a faulty ignition switch could be the primary culprits. Another common mistake is assuming a clicking sound always indicates a faulty starter solenoid. It could also signal a low battery, corroded connections, or a problem with the starter relay. Failing to check the simplest components first, like battery terminals and cables, is another prevalent oversight, often leading to unnecessary disassembly and expense.
Systematic Diagnostic Steps
The eight symptoms previously described provide a starting point for a systematic diagnosis. Each symptom suggests a particular area to investigate. For example, if the engine makes a clicking noise when the ignition key is turned, the focus should be on the battery, cables, and the starter solenoid. A completely silent response might point to a faulty ignition switch or a blown fuse. Slow cranking usually indicates a weak battery, a failing starter motor, or high resistance in the electrical circuit. No cranking at all, without any sound, might be caused by a broken starter motor, a seized starter, or a problem with the starter relay.
Comparing Diagnostic Methods
Visual inspection is the first step. Check battery terminals for corrosion, cables for damage, and the starter motor itself for obvious physical defects. This initial visual assessment often reveals simple problems that can be quickly resolved. Listening for unusual sounds, such as grinding or clicking, during the cranking process, provides valuable clues. A multimeter provides a more precise method for measuring voltage, current, and resistance within the starter circuit. This allows for the identification of voltage drops, short circuits, and other electrical issues that visual inspection cannot detect. Finally, advanced diagnostic tools such as a scan tool can assess the communication between the starter motor and the vehicle’s electronic control unit (ECU), pinpointing potential problems within the vehicle’s electrical system.
Multimeter Testing Procedure
Using a multimeter to test the starter motor and related circuits is a crucial diagnostic step. Remember to always disconnect the negative battery terminal before beginning any electrical testing to prevent accidental short circuits.
- Check Battery Voltage: Connect the multimeter’s probes to the battery terminals. The reading should be close to the battery’s rated voltage (typically 12V). A significantly lower voltage indicates a weak or failing battery.
- Test Battery Cables: Check for voltage drops across the battery cables. A significant voltage drop indicates high resistance in the cable, possibly due to corrosion or damage.
- Test the Starter Solenoid: With the ignition key turned to the “start” position, measure the voltage across the solenoid’s terminals. A voltage drop indicates a problem with the solenoid or its connections. Measure the voltage drop across the solenoid when the starter is engaged.
- Test the Starter Motor: With the starter motor disconnected from the vehicle, measure the resistance across its terminals. A very low resistance indicates a short circuit, while a very high resistance suggests an open circuit, both indicating a faulty starter motor.
- Test the Starter Circuit for Continuity: Check for continuity in the starter circuit wiring using the multimeter’s continuity setting. Lack of continuity indicates a break in the wiring.
Repairs and Preventative Measures

Addressing a failing car starter requires understanding both repair procedures and preventative maintenance. Ignoring preventative measures can lead to costly repairs and unexpected breakdowns, while understanding the repair process empowers you to make informed decisions about professional assistance or DIY solutions. This section details the process of starter replacement, preventative maintenance, and safe jump-starting techniques.
Replacing a Car Starter
Replacing a car starter involves several steps and requires specific tools. Safety is paramount throughout the process. Improper handling of the battery and its connections can lead to injury.
- Disconnect the Battery: Before beginning any work, disconnect the negative (-) terminal of the battery first, followed by the positive (+) terminal. This prevents accidental short circuits.
- Access the Starter: Locate the starter motor, usually mounted on the engine block. Access may require removing various components, depending on the vehicle’s make and model. Consult your vehicle’s repair manual for specific instructions.
- Remove the Starter: Disconnect the electrical connections to the starter, using a wrench to loosen the bolts securing the starter to the engine block. Carefully remove the starter.
- Install the New Starter: Install the new starter motor, ensuring it’s properly aligned and securely fastened. Reconnect the electrical connections.
- Reconnect the Battery: Reconnect the battery terminals, positive (+) first, then negative (-).
- Test the Starter: Attempt to start the engine to confirm the new starter is functioning correctly.
Necessary tools typically include a socket wrench set, a ratchet, various size wrenches, and possibly a battery terminal cleaner. Safety glasses and gloves are also recommended.
Causes of Premature Starter Failure and Prevention
Several factors contribute to premature starter failure. Understanding these factors allows for proactive prevention.
- Corrosion: Corrosion on battery terminals and starter connections hinders electrical flow, increasing stress on the starter motor. Regular cleaning of terminals with a wire brush and application of dielectric grease prevents corrosion.
- Overuse: Repeated attempts to start the engine with a weak battery put excessive strain on the starter. Maintaining a healthy battery charge and addressing any electrical system issues promptly reduces starter strain.
- Mechanical Issues: Worn-out starter components, such as brushes or the solenoid, can cause premature failure. Regular inspection and professional servicing can identify these issues early on.
- Heat: Excessive heat damages starter components. Ensuring proper engine cooling and ventilation helps maintain optimal operating temperatures.
Preventative Maintenance for Extended Starter Lifespan
Regular maintenance significantly extends the lifespan of a car starter.
- Battery Maintenance: Regularly check the battery’s charge level and water levels (if applicable). Replace the battery when necessary.
- Terminal Cleaning: Clean battery terminals and connections regularly using a wire brush and dielectric grease.
- Electrical System Checks: Have the electrical system checked periodically by a qualified mechanic to identify and address any issues that could impact the starter.
- Regular Inspections: Visually inspect the starter motor for any signs of damage or wear during routine maintenance checks.
Jump-Starting a Car with a Dead Battery
Jump-starting a car with a dead battery requires careful adherence to safety procedures to prevent injury or damage.
- Gather Supplies: Obtain jumper cables and a vehicle with a working battery.
- Park Vehicles: Park both vehicles close together, ensuring they are not touching.
- Turn Off Engines: Turn off the engines of both vehicles.
- Connect Jumper Cables: Connect the red (+) cable to the positive (+) terminal of the dead battery, then to the positive (+) terminal of the working battery. Connect the black (-) cable to the negative (-) terminal of the working battery, then to an unpainted metal surface on the engine block of the vehicle with the dead battery (avoid connecting to the negative terminal directly).
- Start the Engine: Start the vehicle with the working battery and let it run for a few minutes.
- Start the Dead Vehicle: Attempt to start the vehicle with the dead battery.
- Disconnect Jumper Cables: Disconnect the jumper cables in the reverse order of connection, ensuring no cables touch each other during the process.
Wrap-Up
Identifying a failing car starter early is crucial for preventing costly repairs and ensuring smooth vehicle operation. By understanding the eight common symptoms discussed—from subtle clicking sounds to complete engine failure—you can effectively diagnose the problem and address it promptly. Remember to utilize preventative maintenance practices to prolong the life of your starter motor and avoid unexpected breakdowns. Regular checks and timely intervention will keep your vehicle running smoothly for years to come.