A malfunctioning PCV valve can significantly impact your vehicle’s performance and longevity. This often-overlooked component plays a crucial role in maintaining engine health by regulating crankcase pressure. Ignoring symptoms can lead to increased oil consumption, reduced engine efficiency, and even more extensive, costly repairs. This guide provides six comprehensive tests to help you accurately diagnose a faulty PCV valve, empowering you to take proactive steps towards maintaining your vehicle’s optimal condition.
Understanding how a PCV valve functions and the consequences of its failure is essential for any car owner. This detailed guide walks you through each step of the diagnostic process, from identifying common symptoms to interpreting test results and taking appropriate action. Whether you’re a seasoned mechanic or a novice DIY enthusiast, this guide provides the knowledge and tools to effectively troubleshoot this vital engine component.
Identifying PCV Valve Symptoms and Their Causes
A malfunctioning Positive Crankcase Ventilation (PCV) valve can lead to a range of noticeable issues in your vehicle’s performance and overall health. Understanding these symptoms is crucial for early diagnosis and preventing more extensive engine damage. Ignoring a faulty PCV valve can result in costly repairs down the line.
PCV valve problems manifest in several ways, impacting engine performance and leading to internal contamination. A failing PCV valve’s primary effect is its inability to properly vent crankcase pressure, leading to a buildup of harmful gases and contaminants within the engine. This, in turn, affects the engine’s efficiency and longevity.
Engine Performance Issues Caused by a Faulty PCV Valve
A malfunctioning PCV valve directly impacts engine performance. The buildup of pressure in the crankcase can lead to decreased engine power, rough idling, and potentially even stalling. Furthermore, the incomplete combustion of gases due to improper venting can result in decreased fuel efficiency and increased emissions. In severe cases, a failing PCV valve can contribute to misfires and other significant engine problems.
Engine Oil Contamination and PCV Valve Failure
The relationship between a failing PCV valve and engine oil contamination is significant. The PCV valve is responsible for removing blow-by gases from the crankcase, which contain combustion byproducts, moisture, and other contaminants. When the valve fails, these contaminants are not properly evacuated and instead mix with the engine oil, diluting it and reducing its lubricating properties. This contaminated oil can lead to increased engine wear, sludge buildup, and ultimately, premature engine failure. The contaminated oil can also increase the acidity of the oil, accelerating corrosion within the engine.
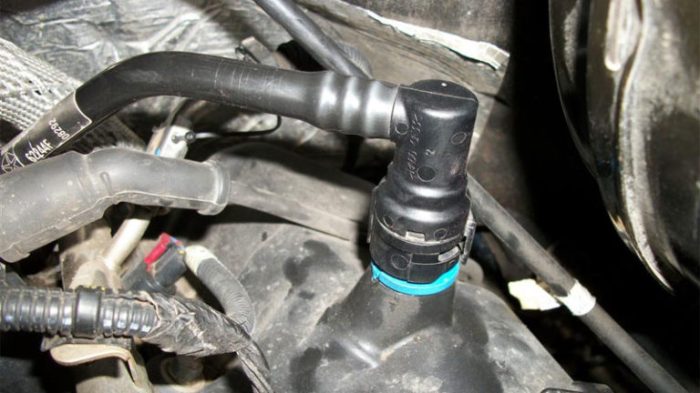
Visual Inspection of the PCV Valve
A visual inspection can often reveal signs of a failing PCV valve. This simple check can save you time and money by helping determine if further testing is necessary.
| Symptom | Cause | Severity | Repair Difficulty |
|---|---|---|---|
| Excessive oil consumption | Blocked PCV valve preventing proper venting, leading to oil being pushed past piston rings. | High | Medium |
| Rough idling or stalling | Buildup of crankcase pressure affecting engine vacuum and air/fuel mixture. | Medium | Low |
| Reduced engine power | Similar to rough idling; pressure buildup restricts engine breathing. | Medium | Low |
| Visible oil residue around the PCV valve | Oil leaking past a faulty valve seal or due to excessive crankcase pressure. | Low to Medium | Low |
| Milky or foamy oil | Water contamination from blow-by gases mixing with oil due to a faulty PCV valve. | High | Medium |
Conducting the Six Diagnostic Tests

Diagnosing a faulty PCV valve requires a systematic approach. The following six tests provide a comprehensive evaluation, allowing you to pinpoint the problem and determine the necessary repair. Remember to always prioritize safety and consult your vehicle’s repair manual for specific instructions and torque specifications.
Visual Inspection of the PCV Valve
A visual inspection is the simplest first step. This helps identify obvious issues before moving to more involved tests. Look for signs of damage, such as cracks, corrosion, or excessive carbon buildup that could restrict airflow.
- Tools Required: Gloves, flashlight, possibly a small wire brush.
- Safety Precautions: Ensure the engine is cool and disconnected from the battery before starting. Work in a well-ventilated area.
- Procedure: Locate the PCV valve (usually a small, plastic or metal valve near the valve cover). Carefully remove it and examine it closely for any visible damage or blockages. Clean any visible debris with a small wire brush if necessary.
Checking for Excessive Crankcase Pressure
Excessive crankcase pressure is a key indicator of a faulty PCV valve. This test involves observing the pressure buildup within the crankcase.
- Tools Required: A pressure gauge capable of measuring low pressures (0-15 PSI range), and a suitable adapter to connect the gauge to the crankcase breather hose.
- Safety Precautions: Ensure the engine is running at idle speed. Wear safety glasses.
- Procedure: Remove the PCV valve. Attach the pressure gauge to the valve’s port on the valve cover. Start the engine and monitor the gauge. Excessive pressure (significantly above the manufacturer’s specifications, often around 1-2 PSI at idle) indicates a problem.
Vacuum Test Using a Vacuum Gauge
A vacuum test helps determine if the PCV valve is properly regulating crankcase pressure. This involves measuring the vacuum in the intake manifold with the PCV valve connected and disconnected.
- Tools Required: Vacuum gauge, vacuum hose, and appropriate adapters to connect to the intake manifold.
- Safety Precautions: Ensure the engine is running at idle speed. Wear safety glasses.
- Procedure: Connect the vacuum gauge to a suitable port on the intake manifold. Record the vacuum reading with the PCV valve connected. Then, disconnect the PCV valve and record the vacuum reading again. A significant difference (a much lower reading when disconnected) points to a malfunctioning valve.
Simple Pressure Test
A simple pressure test assesses the valve’s ability to regulate airflow. This involves applying pressure to one side of the valve and checking for proper release or restriction.
- Tools Required: Air compressor with a low-pressure regulator (avoid high pressure to prevent damage), and a suitable adapter to connect to the PCV valve.
- Safety Precautions: Use caution when working with compressed air. Wear safety glasses and avoid directing the air stream toward yourself or others.
- Procedure: Connect the air compressor to one side of the PCV valve (typically the crankcase side) and set a low pressure (e.g., 5 PSI). Observe if air passes through freely to the other side (intake side). If air does not pass through or the flow is restricted, the valve is likely faulty.
Testing for Restricted Airflow
This test checks if the valve itself is mechanically obstructed.
- Tools Required: Compressed air, and the PCV valve itself.
- Safety Precautions: Use caution when working with compressed air. Wear safety glasses and avoid directing the air stream toward yourself or others.
- Procedure: Blow compressed air through both sides of the PCV valve. Restricted airflow indicates a blockage within the valve.
Testing for Proper Valve Operation
This test verifies the valve’s ability to open and close correctly under varying vacuum conditions. This requires more specialized equipment and often involves using a vacuum pump to simulate intake manifold conditions. It’s best left to a mechanic with the proper tools and experience. While it’s a more involved test, it provides definitive results regarding the PCV valve’s functionality.
Interpreting Test Results and Next Steps
Interpreting the results of the six PCV valve diagnostic tests requires a systematic approach. Inconsistencies between tests can point to other underlying issues, so understanding the potential for discrepancies is crucial before deciding on repair or replacement. This section will detail how to interpret test results, troubleshoot discrepancies, and guide you through the PCV valve replacement process.
Comparing and Contrasting Test Results
Each of the six tests provides a different perspective on the PCV valve’s functionality. A positive result (indicating a faulty valve) in one or more tests strengthens the diagnosis, while negative results might suggest other problems. For instance, a visual inspection revealing a clogged valve, combined with a positive pressure test showing restricted airflow, points strongly to a faulty PCV valve. However, a negative vacuum test coupled with positive pressure and visual inspection results suggests the problem might lie elsewhere in the system, such as a vacuum leak. Discrepancies highlight the need for a comprehensive approach, using all six tests for a complete diagnosis.
Potential Causes for Discrepancies Between Test Results
Discrepancies between test results often stem from factors beyond the PCV valve itself. For example, a faulty vacuum line could lead to a negative vacuum test even if the PCV valve is defective. Similarly, a clogged intake manifold could cause pressure build-up, leading to a positive pressure test regardless of the PCV valve’s condition. Incorrect test procedures, such as insufficient vacuum application during the vacuum test, can also yield inaccurate results. A thorough check of all related components and careful adherence to testing procedures are vital for accurate diagnosis.
Repair or Replacement Recommendations Based on Test Results
The decision to repair or replace the PCV valve depends directly on the test results. If multiple tests, especially the visual inspection, pressure test, and vacuum test, indicate a problem, replacement is usually the best course of action. A simple cleaning might suffice if the visual inspection reveals only minor clogging, and the other tests show only slight deviations from expected results. However, if significant damage or wear is observed, replacement is necessary to ensure proper engine operation and prevent further complications. In cases of discrepancies, addressing the underlying issue (e.g., fixing a vacuum leak) before replacing the PCV valve is essential.
Decision-Making Flowchart Based on Test Results
The following table summarizes the decision-making process based on test results. A simple flowchart could be constructed, starting with “Visual Inspection,” branching to “Positive” (replace PCV valve) or “Negative,” then proceeding to the pressure test, and so on.
| Test | Positive Result (Faulty Valve Indicated) | Negative Result (Faulty Valve NOT Indicated) |
|---|---|---|
| Visual Inspection | Replace PCV Valve | Proceed to Pressure Test |
| Pressure Test | Replace PCV Valve | Proceed to Vacuum Test |
| Vacuum Test | Replace PCV Valve | Investigate other potential causes (e.g., vacuum leaks, clogged intake) |
| Leakdown Test | Significant leak indicates faulty valve, replace | Minimal or no leak, proceed to next test |
| Smoke Test | Smoke escaping indicates leak, likely in PCV system, consider valve replacement | No smoke, investigate other potential causes |
| Compression Test | Low compression may indicate PCV valve issues among other potential problems | Proceed to further diagnostics as needed |
PCV Valve Replacement Process
Replacing a PCV valve is a relatively straightforward procedure, though the specific steps might vary slightly depending on the vehicle make and model. Generally, it involves:
1. Gathering Necessary Tools and Parts: You’ll need a new PCV valve (matching your vehicle’s specifications), a socket wrench (the size will depend on the PCV valve’s retaining nut), possibly a ratchet, and potentially some penetrating oil if the valve is stuck.
2. Locating the PCV Valve: Consult your vehicle’s repair manual to locate the PCV valve’s precise position. It’s typically found on the valve cover or intake manifold.
3. Disconnecting the PCV Valve: Carefully disconnect the vacuum hose(s) connected to the PCV valve. Some vehicles may require removing a retaining clip or clamp.
4. Removing the PCV Valve: Use the appropriate socket wrench to carefully remove the PCV valve from its housing. If the valve is stuck, apply penetrating oil and allow it to sit for a few minutes before attempting removal.
5. Installing the New PCV Valve: Install the new PCV valve, ensuring it’s seated correctly. Tighten the retaining nut to the manufacturer’s specified torque.
6. Reconnecting the Vacuum Hose(s): Reconnect the vacuum hose(s) to the new PCV valve.
7. Testing: After installation, run the engine and observe for any improvements in engine performance or reduction in symptoms. You may want to re-run some of the diagnostic tests to confirm the repair’s effectiveness.
Final Wrap-Up

By systematically applying these six tests, you can confidently diagnose a faulty PCV valve and address the underlying issue. Early detection and prompt repair prevent further engine damage and ensure optimal performance. Remember to always prioritize safety and consult a professional if you encounter any difficulties during the diagnostic process. Proactive maintenance is key to a healthy engine, and understanding your vehicle’s systems is the first step towards achieving that goal. This guide equips you with the knowledge to effectively diagnose and address PCV valve issues, saving you time, money, and potential headaches down the road.